Making a 2D game engine/framework with raylib
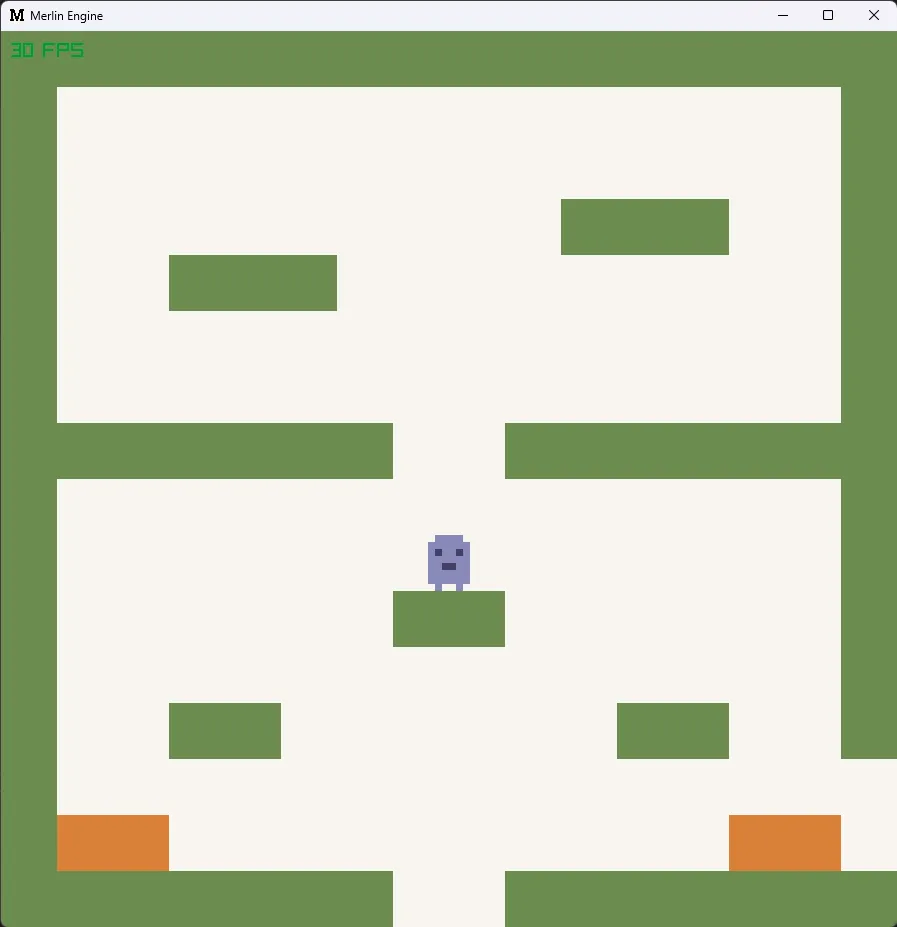
There’s something great about programming at a low level. You have control over every aspect of the project, you have the peace of mind that any problem you encounter is probably your own. So when I sat down one day and decided I wanted to make a game engine from scratch I knew it’d be a fun process, something meditative to take my mind off other school and game projects when I wanted to.
So I got started by creating a cpp file! I am kind of lying that this is super low-level. I didn’t create my own renderer (that is something I have wanted to do, and I have had a bit of fun messing around with open GL, but haven’t had the time for anything serious yet), in fact, I am using a library called raylib, which can be used to handle windows, rendering in 2D and 3D, loading shaders, handling input and audio… in fact… quite a lot of the lowest of low-level stuff and all in one import too. But I’ll mainly just use its renderer to draw stuff to a window.
Engine design
So that’s a great starting point. Next up I decided to create an architecture of what I wanted to build on top of Raylib. I decided I want to use a very object-oriented design for my engine. This is partly because Godot is very object-oriented and I figured it will be easier to implement something similar to what I am already familiar with, but also because it’s what they encourage us to do in most things at school and I’m just not very familiar with ECS or other paradigms… I also don’t really care about the intricacies of performance differences between different design paradigms and just want to go with what I know.
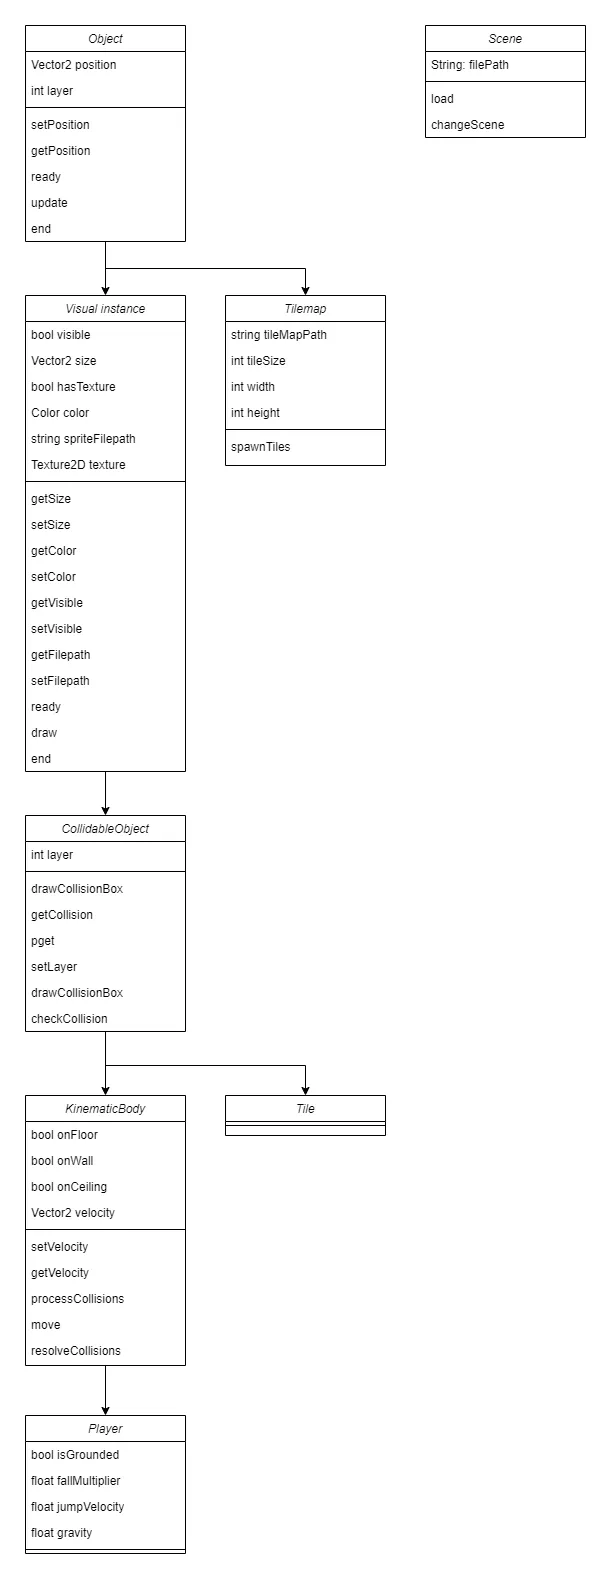
Either way, I started with this class diagram. All objects in my game would inherit from the game object class, which just holds the object’s position. We will then have a series of inheritance of a visual instance, adding a height, width and colour, a collision object with functions for detecting and resolving collisions, and a kinematic body with functions and variables to help move around. As well as this, we will be able to load tilemaps with the tilemap class, which will spawn tile objects. And of course, we will also have a player object that we can control.
Game loop
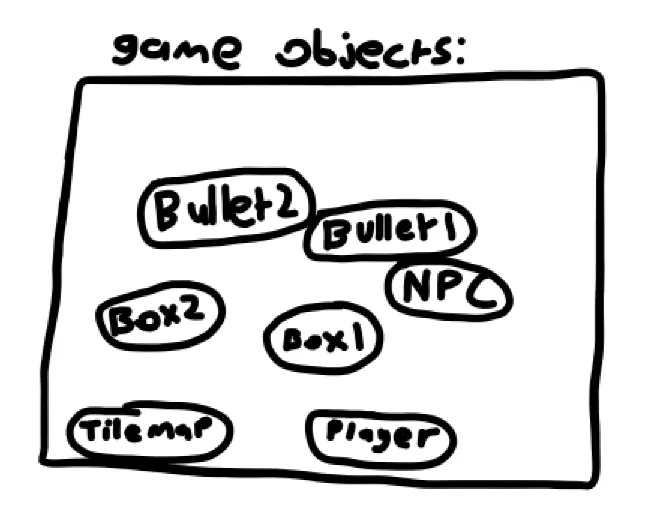
So after making the game object and visual instance classes I am now able to create objects and see them on the screen. But before I go any further I need to think about the game loop. It’s not very convenient or clean to be creating every single object at the start of the main function so we need a solution. The solution was that we would start the game by creating a vector called gameObjects. gameObjects would hold an index of every single object in the scene, which we can easily loop through to initialise, update and draw.
So in our main function, we can have the following structure:
- Initialise the window
- Create the gameObjects vector
- Call the ready function, where all game objects are looped through, calling each object ready method
- Begin the game loop
- Call the update function, where all game objects are looped through, calling each objects update function
- begin drawing
- Call the draw function, where all game objects are looped through calling each objects draw function, if it inherits from the visual instance class.
- deinitialise the window.
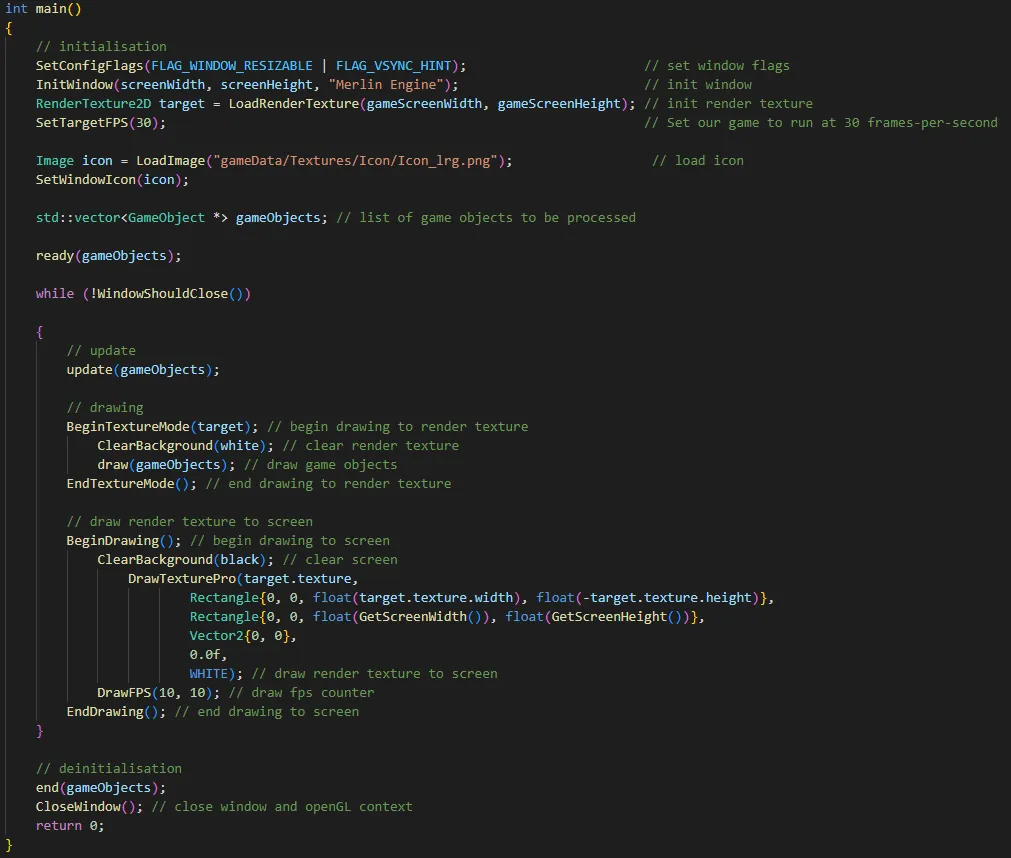
On a short side note. I decided I was mostly going to use my engine for low resolution games or at the very least, applications with a fixed resolution. The best solution in raylib for this is to use a render texture, where all the objects are not drawn to the screen, but to a render texture which is then stretched to fit the window. This means I do not have to worry about making things fit any resolution but the one I want, which for my test project will just be 128*128.
Collision objects
Cool. So Now we have a structure that lets us easily create game objects, and they will be initialised, updated and drawn to the screen, so long as they are in the gameObjects vector. Next up is detecting and resolving collisions. As it turns out, detecting collision boxes is not a massive problem, it’s simply checking if two boxes of position x and y, and dimensions w and h are overlapping. This type of detecting collisions is called axis-aligned bounding box collisions since we are not worrying about our collision shapes rotating.
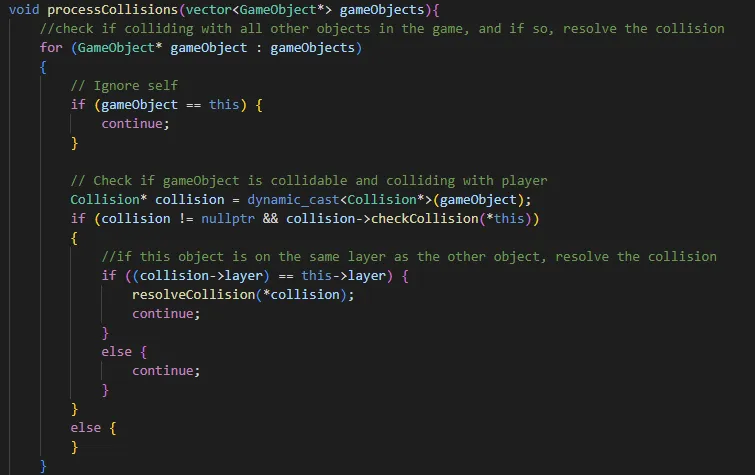
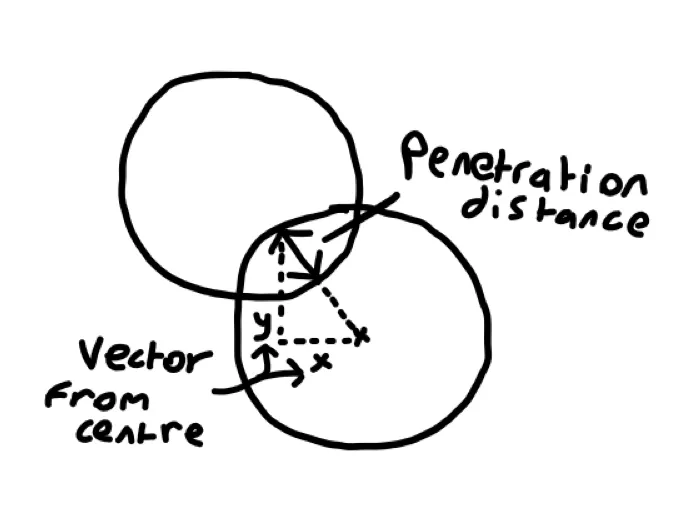
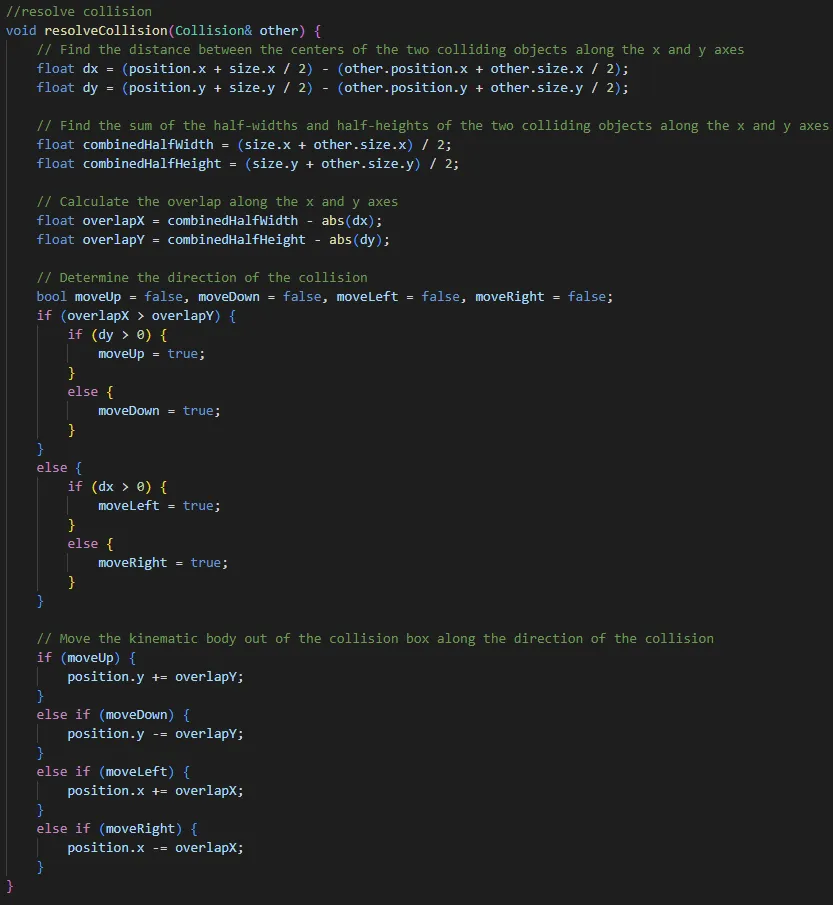
Now if that bit was relatively simple, actually resolving the detected collisions is a little bit more complicated. Essentially, we need to figure out which direction we are colliding with, and by how far, so we can move our objects apart by that vector. Many collision resolution techniques I see online are in relation to physics simulations and usually circles, where the aim is to find the distance the circles are colliding and move them apart. However, since this is a game engine and we don’t want any physics simulations, we want to consider it a bit differently.
collision resolution for to circles.
Firstly, since we only have basic box collision shapes, we can limit the vectors that we are going to resolve the collision to 4. Up, down, left, or right. Because the player is always going to either be to the left, right, top or bottom of a box, and we never want to resolve diagonally.
Which way do I move the player?
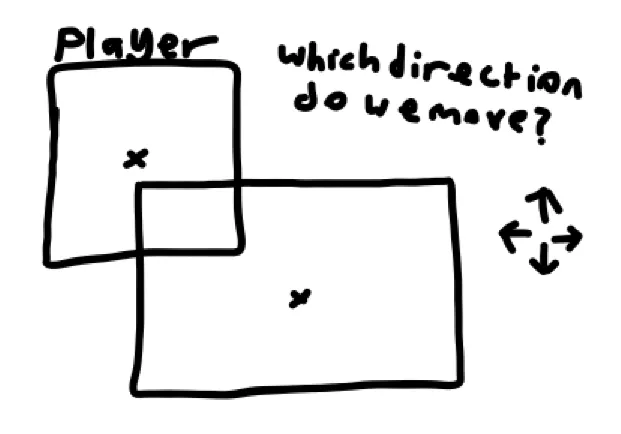
But this adds some complexity. How do we know what direction to resolve the collision? I decided to do this by checking which axis the overlapp is larger, the x-axis or the y-axis. If the overlap is greater on the x axis, the function will then check whether the other object is above or below itself, and sets the relevant bool to indicate this. We then detect the overlapp of the objects and move the object by that distance and in that direction.
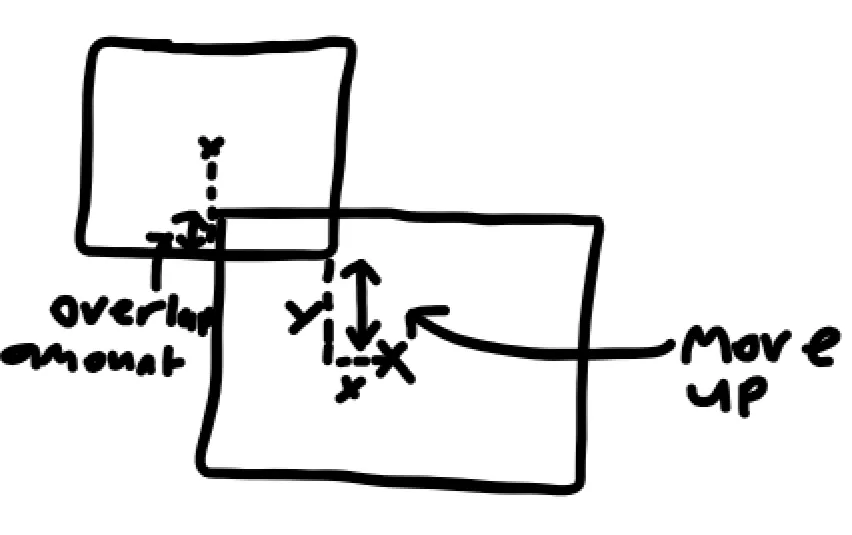
Nice! And when I added a player object that’s affected by gravity and can move about, this works well! The main problem with this type is performance, since, for each kinematic body, every frame we must loop through all collision objects in the game, check if they are colliding, and if they are, resolve the collision. For me, this doesn’t matter too much as I do not intend on using this engine for large worlds with tens of thousands of collision objects and if I did, I would have to consider some further optimisations.
Tilemaps
I also wanted to add a basic tilemap loader to my engine, to simplify and speed up level design.
The basic premise of adding a tilemap is fairly simple. You want to read from a file, and for each piece of data spawn an object (such as a ground tile) at the relevant location. In my case, I want to read from a file like this: Where the first line defines some information on the size of the tilemap, and the rest of the data represents the type of object to spawn and where.
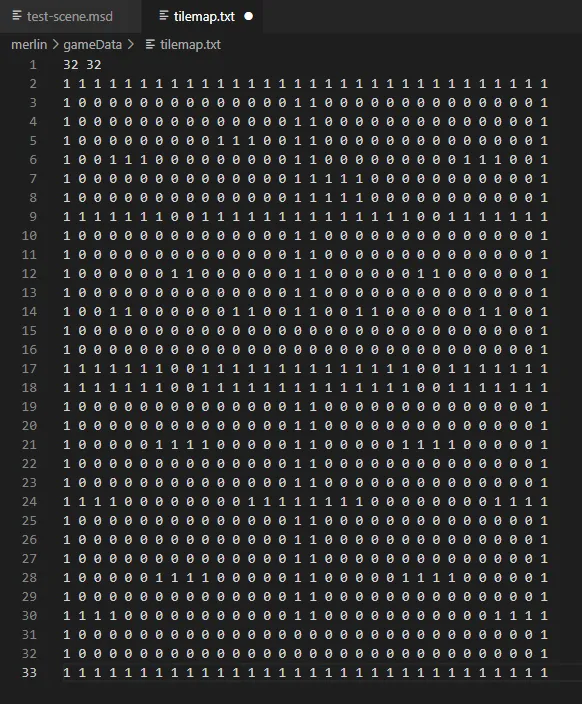
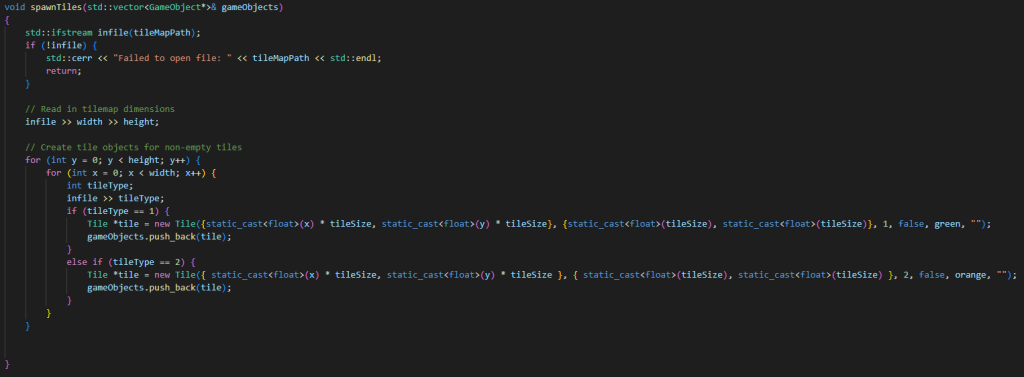
So, I wrote a class that does just that. For each character, on each line, the code will check what value it is. In this case, for 1, it will spawn a plain tile object, which the player will collide with and for 0, it will spawn nothing. For two, it will spawn a plain tile with a different color and collision layer, so the player will pass right through it.
Pixel get
One final feature that I wanted to add to make this a feasibly usable engine is similar to a ray cast. In Pico 8 it is called Pget, a function which will check the required pixel on the screen to see if an object with your collision layer is there. This is going to be super useful for getting information about the world, such as if the player is grounded (and therefore whether they can jump) or other interactive things. The function works simply by looping through all the collision objects, and checking if a) they have the required collision layer and b) they are colliding with the point required. Once again, I am a bit concerned about the performance of this, since we could be looping through a lot of objects, but I don’t expect to be using this engine for anything massive.

Outro
So that’s it so far. I have some extra stuff in the works, such as being able to dynamically load and destroy scenes, using a basic ‘scene description’ file, as well as adding animated sprites and stuff. But even with what I have here, I can definitely get started creating some fun little games and maybe even some simulations (I have always wanted to make some cellular automata and ecosystem simulations). Thanks a lot for reading this far, I hope it was somewhat beneficial or interesting for you!
Check out the repository for merlin here!